The ICONICS suite can be deployed on-premises, in private clouds/datacenters, and in public cloud environments. In addition, and for your convenience, ICONICS provides pre-configured solutions in Microsoft Azure Marketplace that you can run on a Microsoft Azure virtual machine. Our support for Azure lets you create a development system in the Cloud for evaluating the ICONICS suite which means you don't need to purchase, configure, and maintain your own hardware. And it only takes minutes to configure our software on Azure. Let’s see how.
Configuring ICONICS Software on Microsoft Azure in 15 Minutes or Less
Part 1. Setting up an Azure free trial account (if you don’t already have an Azure account)
Part 2. Setting up the Azure virtual machine to host ICONICS applications
ICONICS uses virtual machines to run the GENESIS64 software in cloud environments. A virtual machine is like any other computer, but instead of having physical hardware, the virtual machine (or “VM”) exists as a software-defined computer. You can learn more about the basics of VMs from Microsoft.
To deploy ICONICS VMs to Microsoft Azure, you’ll need an Azure account. If you don’t already have one, you can either set up a free trial or a “pay as you go” account. The 30-day free trial account includes $200 USD Azure credits as of this writing. You’ll be prompted to create a pay-as-you-go account if you use up your Azure credits.
It is important to monitor your actual Azure usage when using pay-as-you-go accounts. You can use the Cost Management section of the Azure Portal to keep track of your utilization. In general, it is wise to use the minimum Azure resources needed for the required duration. You can learn more about Azure Cost Management + Billing from Microsoft directly.
Part 1: Setting up your free trial account (if you don’t already have an Azure account)
- Go to Create Your Free Azure Account Today where you can choose between “Start free” or “Pay as you go”.
- Choose the “Start free” option. Once you set up your Azure account, you will be directed to the Azure Quick Start Center. Here, you will have access to many help videos like “Get more from your Azure free account” to help you understand and navigate within the platform.
Part 2: Setting Up Your Azure Virtual Machine to run the ICONICS environment
- Once you have an Azure account, access the Azure portal. Click on the three small horizontal bars at the top left to pull up the Portal menu.

- In the Portal menu, click “All services” to open a full list of services.
- Scroll down to click on “General”.
- From the list that appears on the page, choose “Marketplace”.
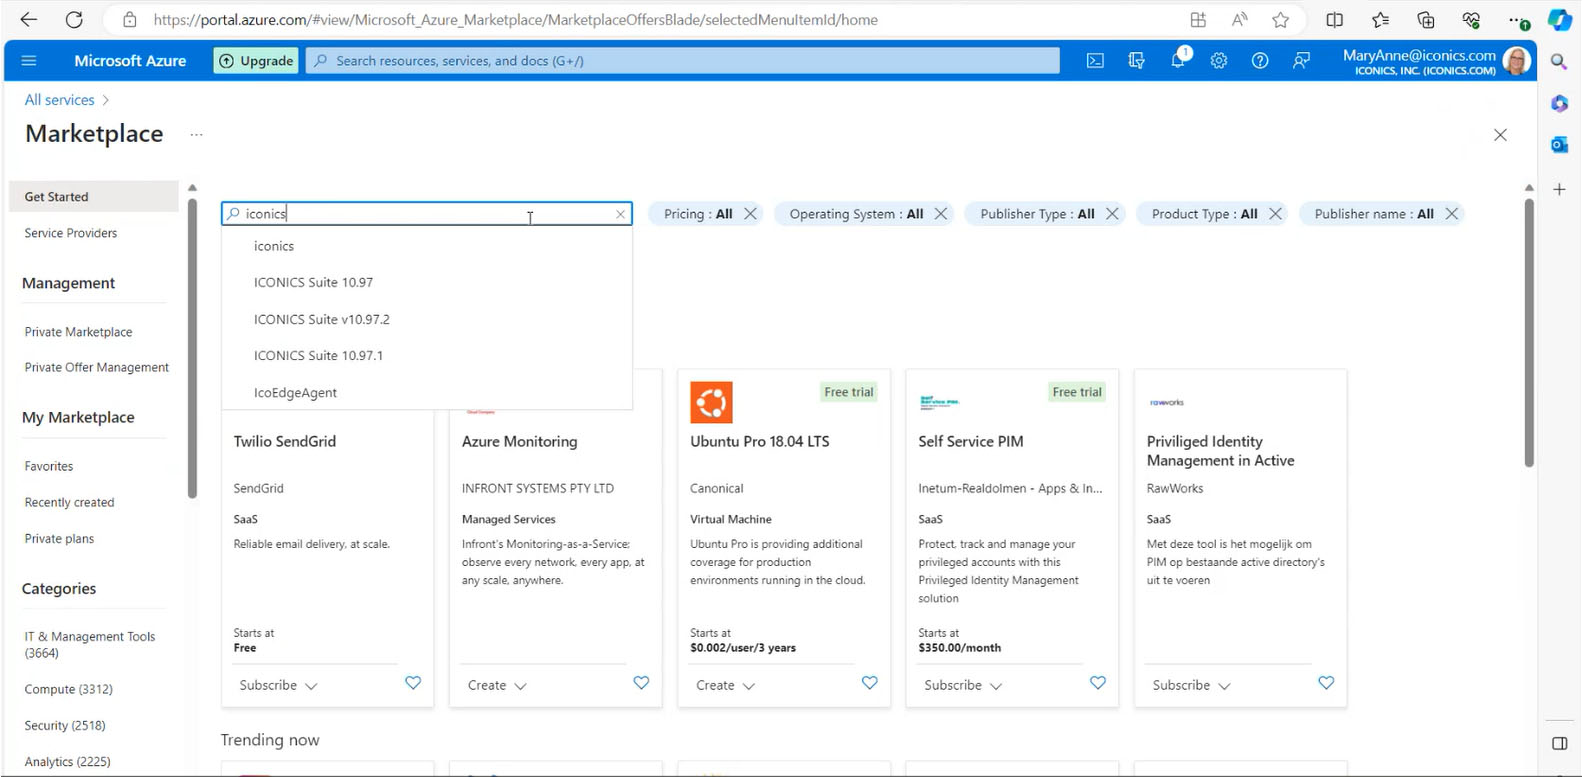
- On this page, in the “Search the Marketplace” box at the top, type in ICONICS.
- The page shows all ICONICS versions you can access. We recommend using the latest available version of GENESIS64 (version 10.97.3 as of this writing).
- Click on ICONICS Suite v10.97.2 to bring you to the corresponding version’s page
- You have a choice between “Create” which directly brings you to creating a virtual machine and “Start with a pre-set configuration” which is a lengthier path to creating a virtual machine. Both choices get you to the same point, so we suggest that you click on “Create” and ignore the other option. ” As an important note: You can hover over the encircled “i” to read information about each field.
- Clicking on “Create” will bring you to the “Create a virtual machine” page. On the left side of this page, you have the following: “Project details: Select the subscriptions to manage deployed resources and costs. Use resource groups like folders to organize and manage all your resources.”; and “Subscription and Instance details, both of which have fields to complete.
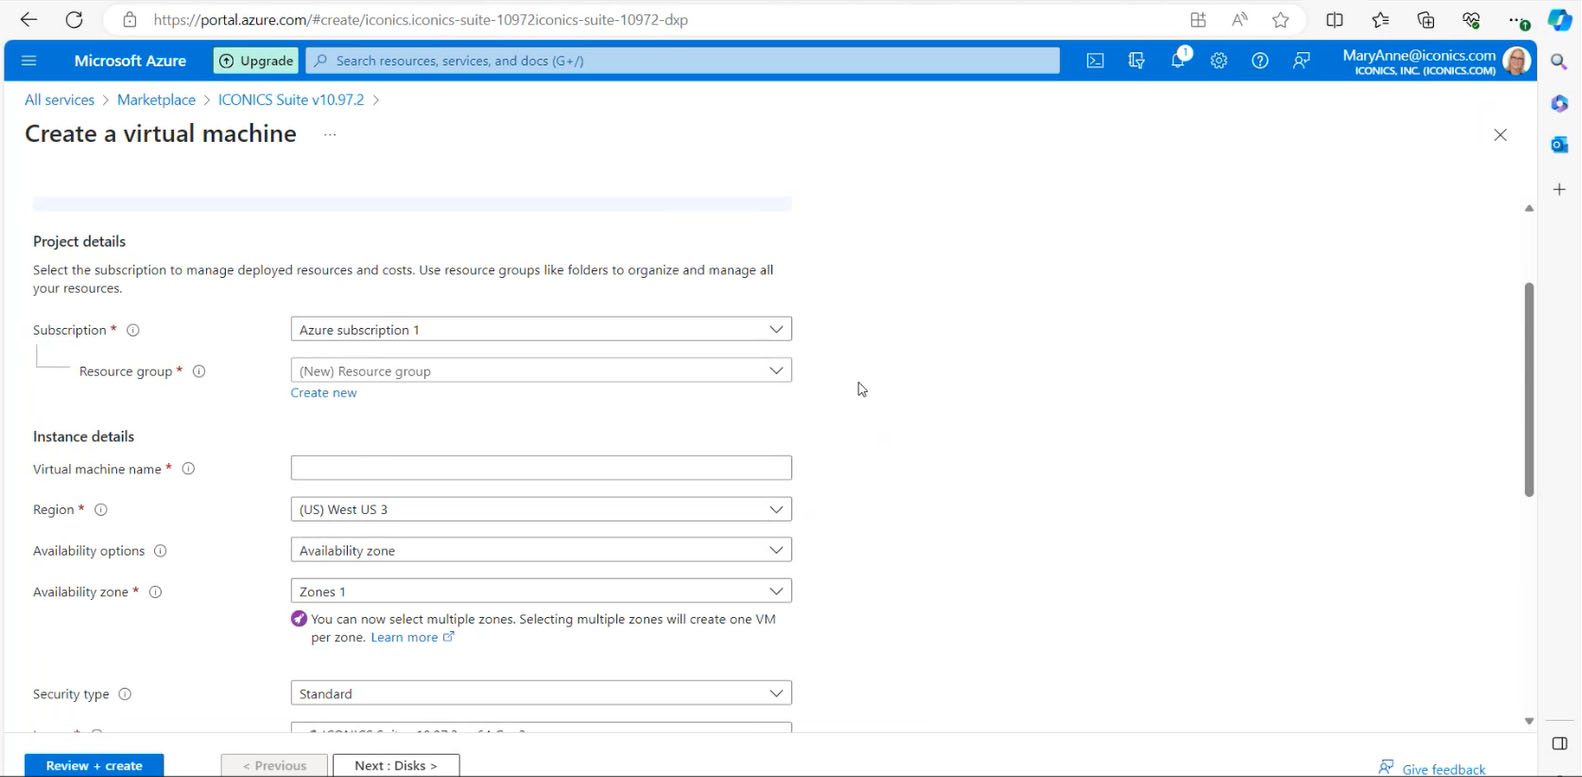
- Under “Subscription”, go to “Resource group” to name your “Resource group”. We strongly recommend that you change the default name of the resource group to something meaningful and relevant to you and your company/project. We also recommend using a hyphen between words in the name for easy identification. For example, companyname-department-resource-group.
- Next under “Instance details”, the first field is “Virtual machine name”. Here you need to provide an user friendly name for your virtual machine.
- For the “region” field, choose the region you prefer in the drop-down menu.
- For the “availability options”, choose the default.
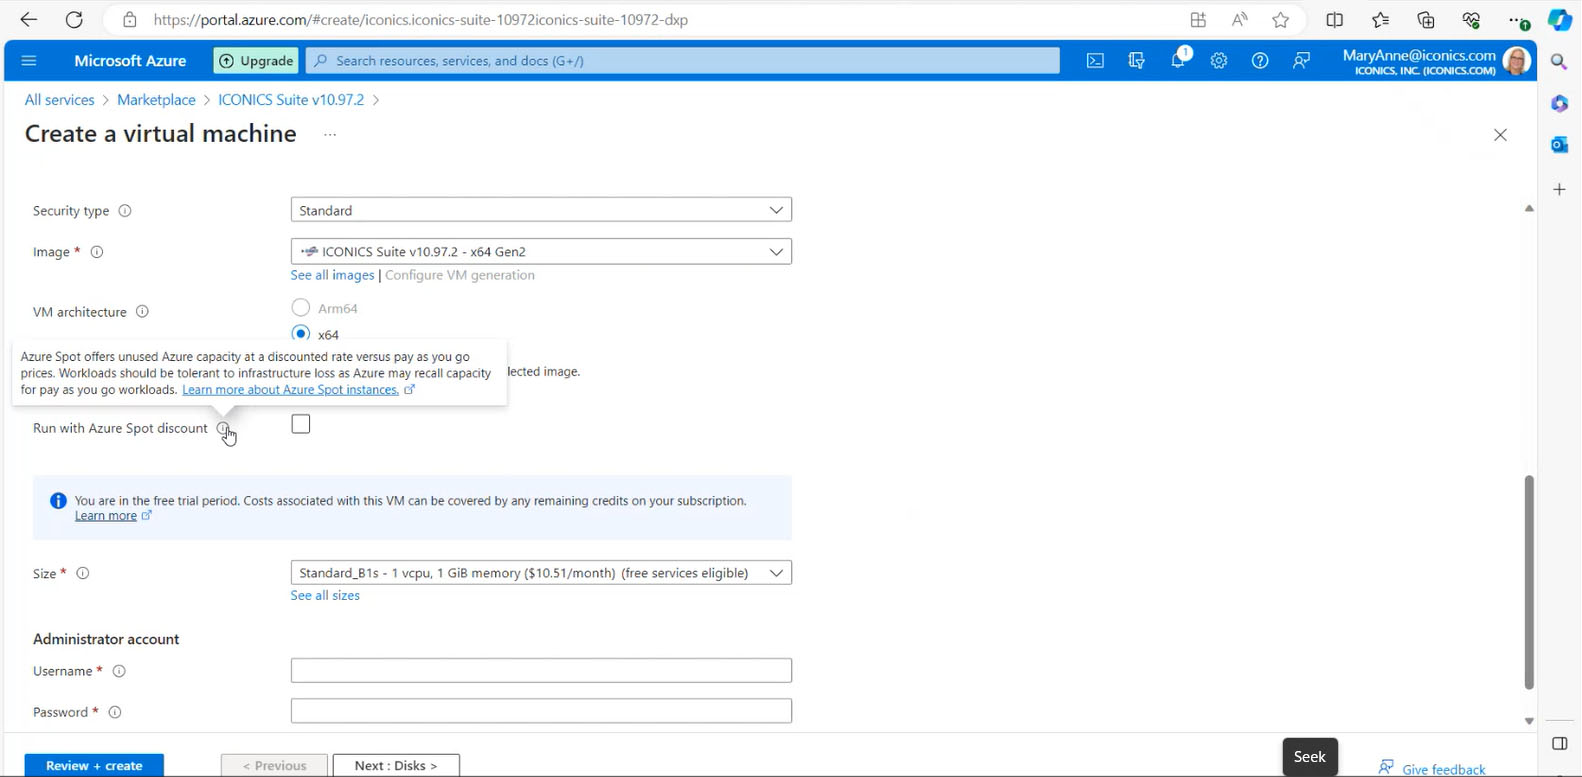
- For the “security type”, choose “standard”.
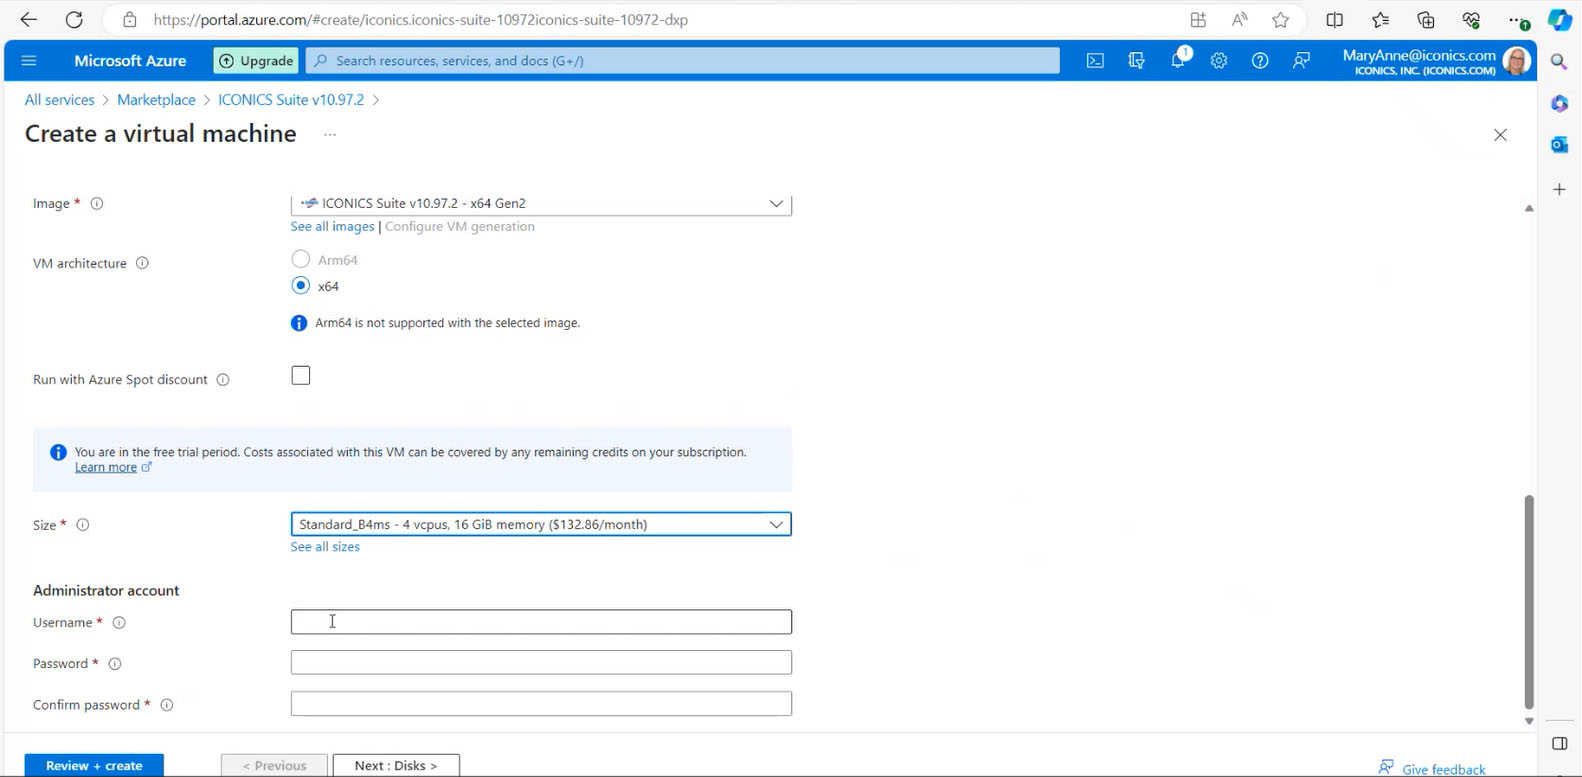
- The “image” field will display the ICONICS software you chose from the ICONICS marketplace offerings. In this case, we chose v10.97.2, so this was shown in the field.
- For the VM architecture, choose the default option.
- You then have an option to choose the “Run with Azure Spot discount”. Do not choose this option with the free trial. (You might choose this if you already have an Azure account and were paying to use the VM.)
- For “Size”, you need a minimum of 4 CPUs and 16 GB memory. You can see all the available sizes when you click on “See all sizes”. The recommended VM size for the ICONICS suite is Standard_B4ms, so choose this option unless you have more specific requirements.
- The next step is to set the username and password under the “Administrator account”. Over the Internet, you need to have credentials to access the virtual machine in Windows. Again, you will choose a relevant username and password and one that complies with your company’s username/password requirements. Click on “Create” and Azure will notify you if there is a problem. If there are any issues, you can go back to “Basics” to see what field(s) you need to revise. Next, Azure will display all the details of your VM for you to review. You might need to fill in additional fields like telephone number and email address, etc.
- Once you finish reviewing the information, you can click on “Create” again. Then sit tight and wait while Azure is creating your VM (this may take several minutes).
- Azure will notify you when deployment is complete. At this time, you can click on “Go to resource” which will bring you to your VM
- Copy the public IP address. You can hover over the address to show the “copy” pop up window.
- Click on the Start button in Windows, the well-known blue 4 squares within a square Windows symbol. Type in “Remote Desktop Connection” in the Search pane to bring up this application.
- Click on the “Remote Desktop Connection” and paste in the IP address. At this point, simply follow the prompts. The prompts will depend on the type of Azure account you have. If you had set up a free trial account, Azure will display “Email address” and “Username” and you should input the username and password you used when setting up for your virtual machine. Azure will then connect to your VM.
- The Server Manager – Dashboard will open. You can safely close this window.
- To access the software, click on the Windows Start button within your VM to bring up the menu on the left. Choose the ICONICS Product Suite folder and then choose the tool you want to access, for example GraphWorX64.
Microsoft may periodically update the UI of the VM setup page, so the steps might vary slightly for you as a consequence. You can contact Microsoft Azure Support if you have a question or need help.
Concluding Thoughts
Using ICONICS on Azure is made easier by leveraging the preconfigured virtual machines available from Azure Marketplace. Because of these VMs flexibility and portability, Microsoft cites the following benefits to this approach:
- Agility and speed—Spinning up a VM is relatively easy and quick, and is much simpler than provisioning an entire new environment for your developers. Virtualization makes the process of running dev-test scenarios a lot quicker.
- Lowered downtime—VMs are portable and easy to move from one hypervisor to another on a different machine—this means that they are a great solution for backup, in the event the host goes down unexpectedly.
- Scalability—VMs allow you to more easily scale your apps by adding more physical or virtual servers to distribute the workload across multiple VMs. As a result, you can increase the availability and performance of your apps.
If you do choose to access ICONICS software through Azure Marketplace and need additional information to get started, ICONICS has a wealth of training videos and classes available in the “Resources” section of ICONICS.com. You can also contact us at support@iconics.com to ask one of our experts for help.
Written By:
Mary Anne Ballouz,
Marketing Communications Writer
Tags: "automation technology", "cloud technology", "Smart Production Solutions"